⚠️
Screen Capture Restricted

Confidential Clinical Study Reviewer. Real-time visual protection active.
Return focus to window to resume study session.

⚠️ Content saving, copying, and screen captures are strictly disabled.
☣️ Quarantine Clearance · Level 4
🔒

K-Pop Demon Hunters

Zombie Run Plenary Skeletal Radiology Reviewer · 8 Clinical Stations

⚠️ Passcode incorrect. Access denied.
☣️ ZOMBIE RUN K-POP DEMON HUNTERS PLENARY REVIEWER
Case 1 of 8: Rumi's Head Trauma
1 🟢 HUNTR-01: Rumi
2 🟢 HUNTR-02: Jinu
3 🟢 HUNTR-03: Abby Saja
4 🔴 HUNTR-04: Zoey
5 🟢 HUNTR-05: Healer Han
6 🔴 HUNTR-06: Baby Saja
7 🔴 HUNTR-07: Celine
8 🟢 HUNTR-08: Bobby
📊 All 8 Cases Summary
Rumi
HUNTR-01 Lead Striker · Spirit Blade

Case 1: Rumi's Head Trauma

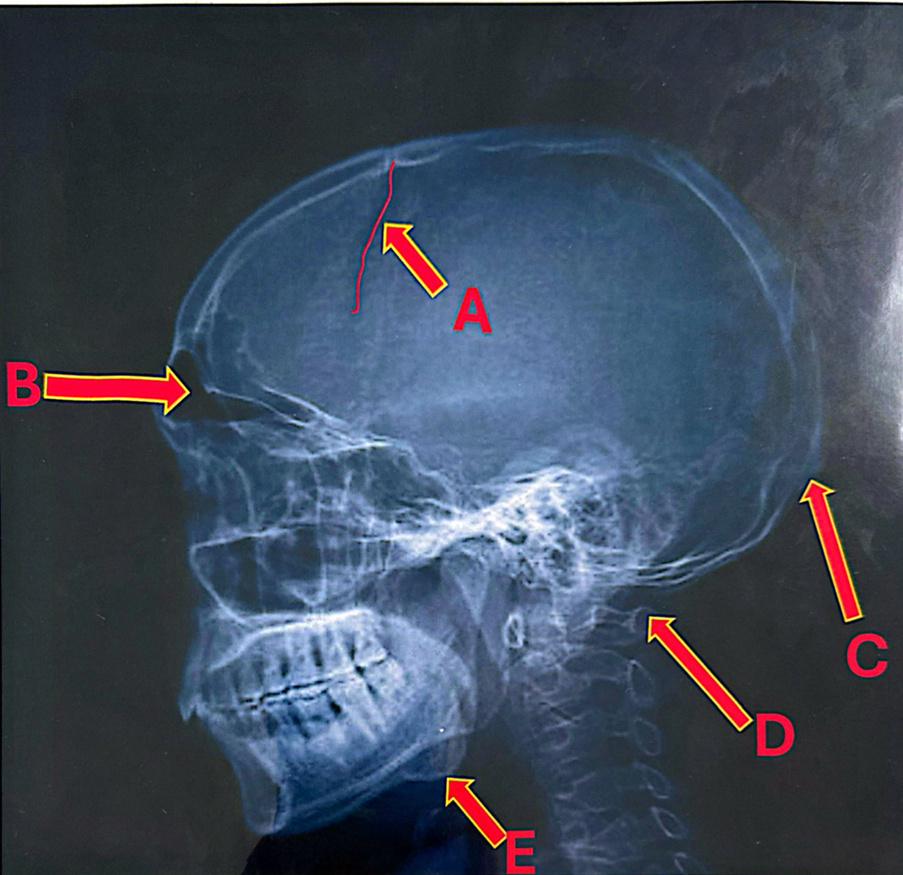
Station 1 Group 13 & Group 14 Rumi, 23-year-old Female

Hit on the vertex of her head during combat.

Chief Complaint

Acute dizziness, headache, and 'seeing stars'.

Physical Examination

Fully alert and oriented (GCS 15). Scalp tenderness at vertex. No skull depression, no cuts, no signs of basilar fracture (no raccoon eyes or Battle's sign).

Modality

Lateral Skull Radiograph

🟢 NORMAL
Diagnosis & Finding
Concussion (Mild Traumatic Brain Injury - mTBI)
Intact skull contours. No fracture lines cutting across bone, no depressed bone fragments, no intracranial air (pneumocephalus).
Case 1: Rumi's Head Trauma
🎯 Target Landmark Recognition Guide (A–E)
A Coronal Suture
🎯 Quick Anchor Start at the very top contour of the skull (vertex) and scan about one-third forward toward the forehead.
🔍 How to Trace Follow the jagged, wavy seam running downward and forward across the cranial vault toward the sphenoid bone.
💡 Dead Giveaway Serrated, interdigitating 'puzzle piece' borders lined with a thin, dense white sclerotic margin.
⚠️ Don't Confuse With Do NOT mistake for a skull fracture! Sutures are wavy with white sclerotic edges; traumatic fractures are sharp, straight/linear, dark, and branch without sclerotic borders.
B Frontal Sinus
🎯 Quick Anchor Find the supraorbital ridge / upper rim of the eye socket.
🔍 How to Trace Look directly above the bridge of the nose inside the lower frontal bone.
💡 Dead Giveaway Dark, scalloped, radiolucent air pocket enclosed between the inner and outer tables of the frontal bone.
⚠️ Don't Confuse With Do NOT confuse with the orbit (which is much larger and inferior) or ethmoid air cells (which sit deeper and lower behind the nasal bridge).
C External Occipital Protuberance (Inion)
🎯 Quick Anchor Slide your eyes down the smooth curved posterior contour of the occiput toward the neck.
🔍 How to Trace Locate the junction where the skull vault meets the posterior neck musculature.
💡 Dead Giveaway A distinct, backward-pointing beak-like bony prominence at the midline of the squamous occipital bone (anchor for the nuchal ligament).
⚠️ Don't Confuse With Do NOT confuse with the posterior arch of C1, which sits below the skull base completely separate from the cranial vault.
D Posterior Arch (Posterior Tubercle) of Atlas (C1)
🎯 Quick Anchor Look immediately beneath the foramen magnum and occipital condyles at the very top of the neck.
🔍 How to Trace Trace the delicate first cervical ring. C1 has NO vertebral body and NO true spinous process.
💡 Dead Giveaway A small, rounded cortical nubbin positioned directly below the occiput and superior to the massive C2 spine.
⚠️ Don't Confuse With Do NOT confuse with the spinous process of C2 (Axis)! C2's spine is massive and hatchet-shaped; C1 has only this small posterior tubercle.
E Hyoid Bone
🎯 Quick Anchor Look in the anterior neck soft tissues, inferior to the angle and lower border of the mandible.
🔍 How to Trace Find the horizontal structure floating freely at roughly the C3 vertebral level.
💡 Dead Giveaway A distinct, U-shaped / horizontal cortical bar floating in soft tissue with no bony articulation to the spine.
⚠️ Don't Confuse With Do NOT confuse with calcified thyroid cartilage (which sits lower around C4-C5 and appears irregular/speckled) or the styloid process.
🗺️ Other Identifiable Structures on this View
8 Landmarks Listed
Structure Region / Bone Key Radiographic Recognition Cue
Vertex Superior Vault Highest anatomical point of the skull; formed by the parietal bones near sagittal suture.
Parietal Bone Calvaria Large quadrilateral curved bone between the coronal suture anteriorly and lambdoid suture posteriorly.
Lambdoid Suture Posterior Vault Dense serrated suture separating the parietal bones from the squamous occipital bone.
Sella Turcica & Pituitary Fossa Sphenoid Bone Cup-shaped saddle in the sphenoid body housing the pituitary gland; bounded by anterior and posterior clinoid processes.
Anterior & Posterior Clinoid Processes Sphenoid Bone Small horn-like bony projections flanking the pituitary fossa.
Mastoid Air Cells Temporal Bone Spongy, honeycomb-like air spaces behind and below the external acoustic meatus.
Orbital Plate of Frontal Bone Anterior Cranial Fossa Horizontal curved bony shelf forming both the roof of the orbit and the floor of the anterior cranial fossa.
Angle of Mandible (Gonion) Mandible Prominent posteroinferior corner where the horizontal body meets the vertical ramus of the lower jaw.
📋 Clinical & Radiologic Pearls
Clinical Rule: In adult head trauma, a normal skull radiograph rules out a displaced cranial vault fracture, but does NOT rule out an intracranial hemorrhage (epidural, subdural, subarachnoid).
Canadian CT Head Rule: A GCS 15 patient with mild concussion, no loss of consciousness >5 min, no amnesia >30 min, and no high-risk signs requires observation, not mandatory head CT.
Jinu
HUNTR-02 Acrobat Vanguard · Lead Vocal

Case 2: Jinu's Stage Rehearsal Fall

Station 2 Group 15 Jinu, 24-year-old Male

Fell backwards off a rehearsal stage during choreography practice.

Chief Complaint

Occipital scalp tenderness, mild headache. Denies nausea, vomiting, or vision changes.

Physical Examination

GCS 15. Pupils equal, round, and reactive to light (PERRLA). Cranial nerves II–XII intact. Scalp hematoma over occiput, no step-off.

Modality

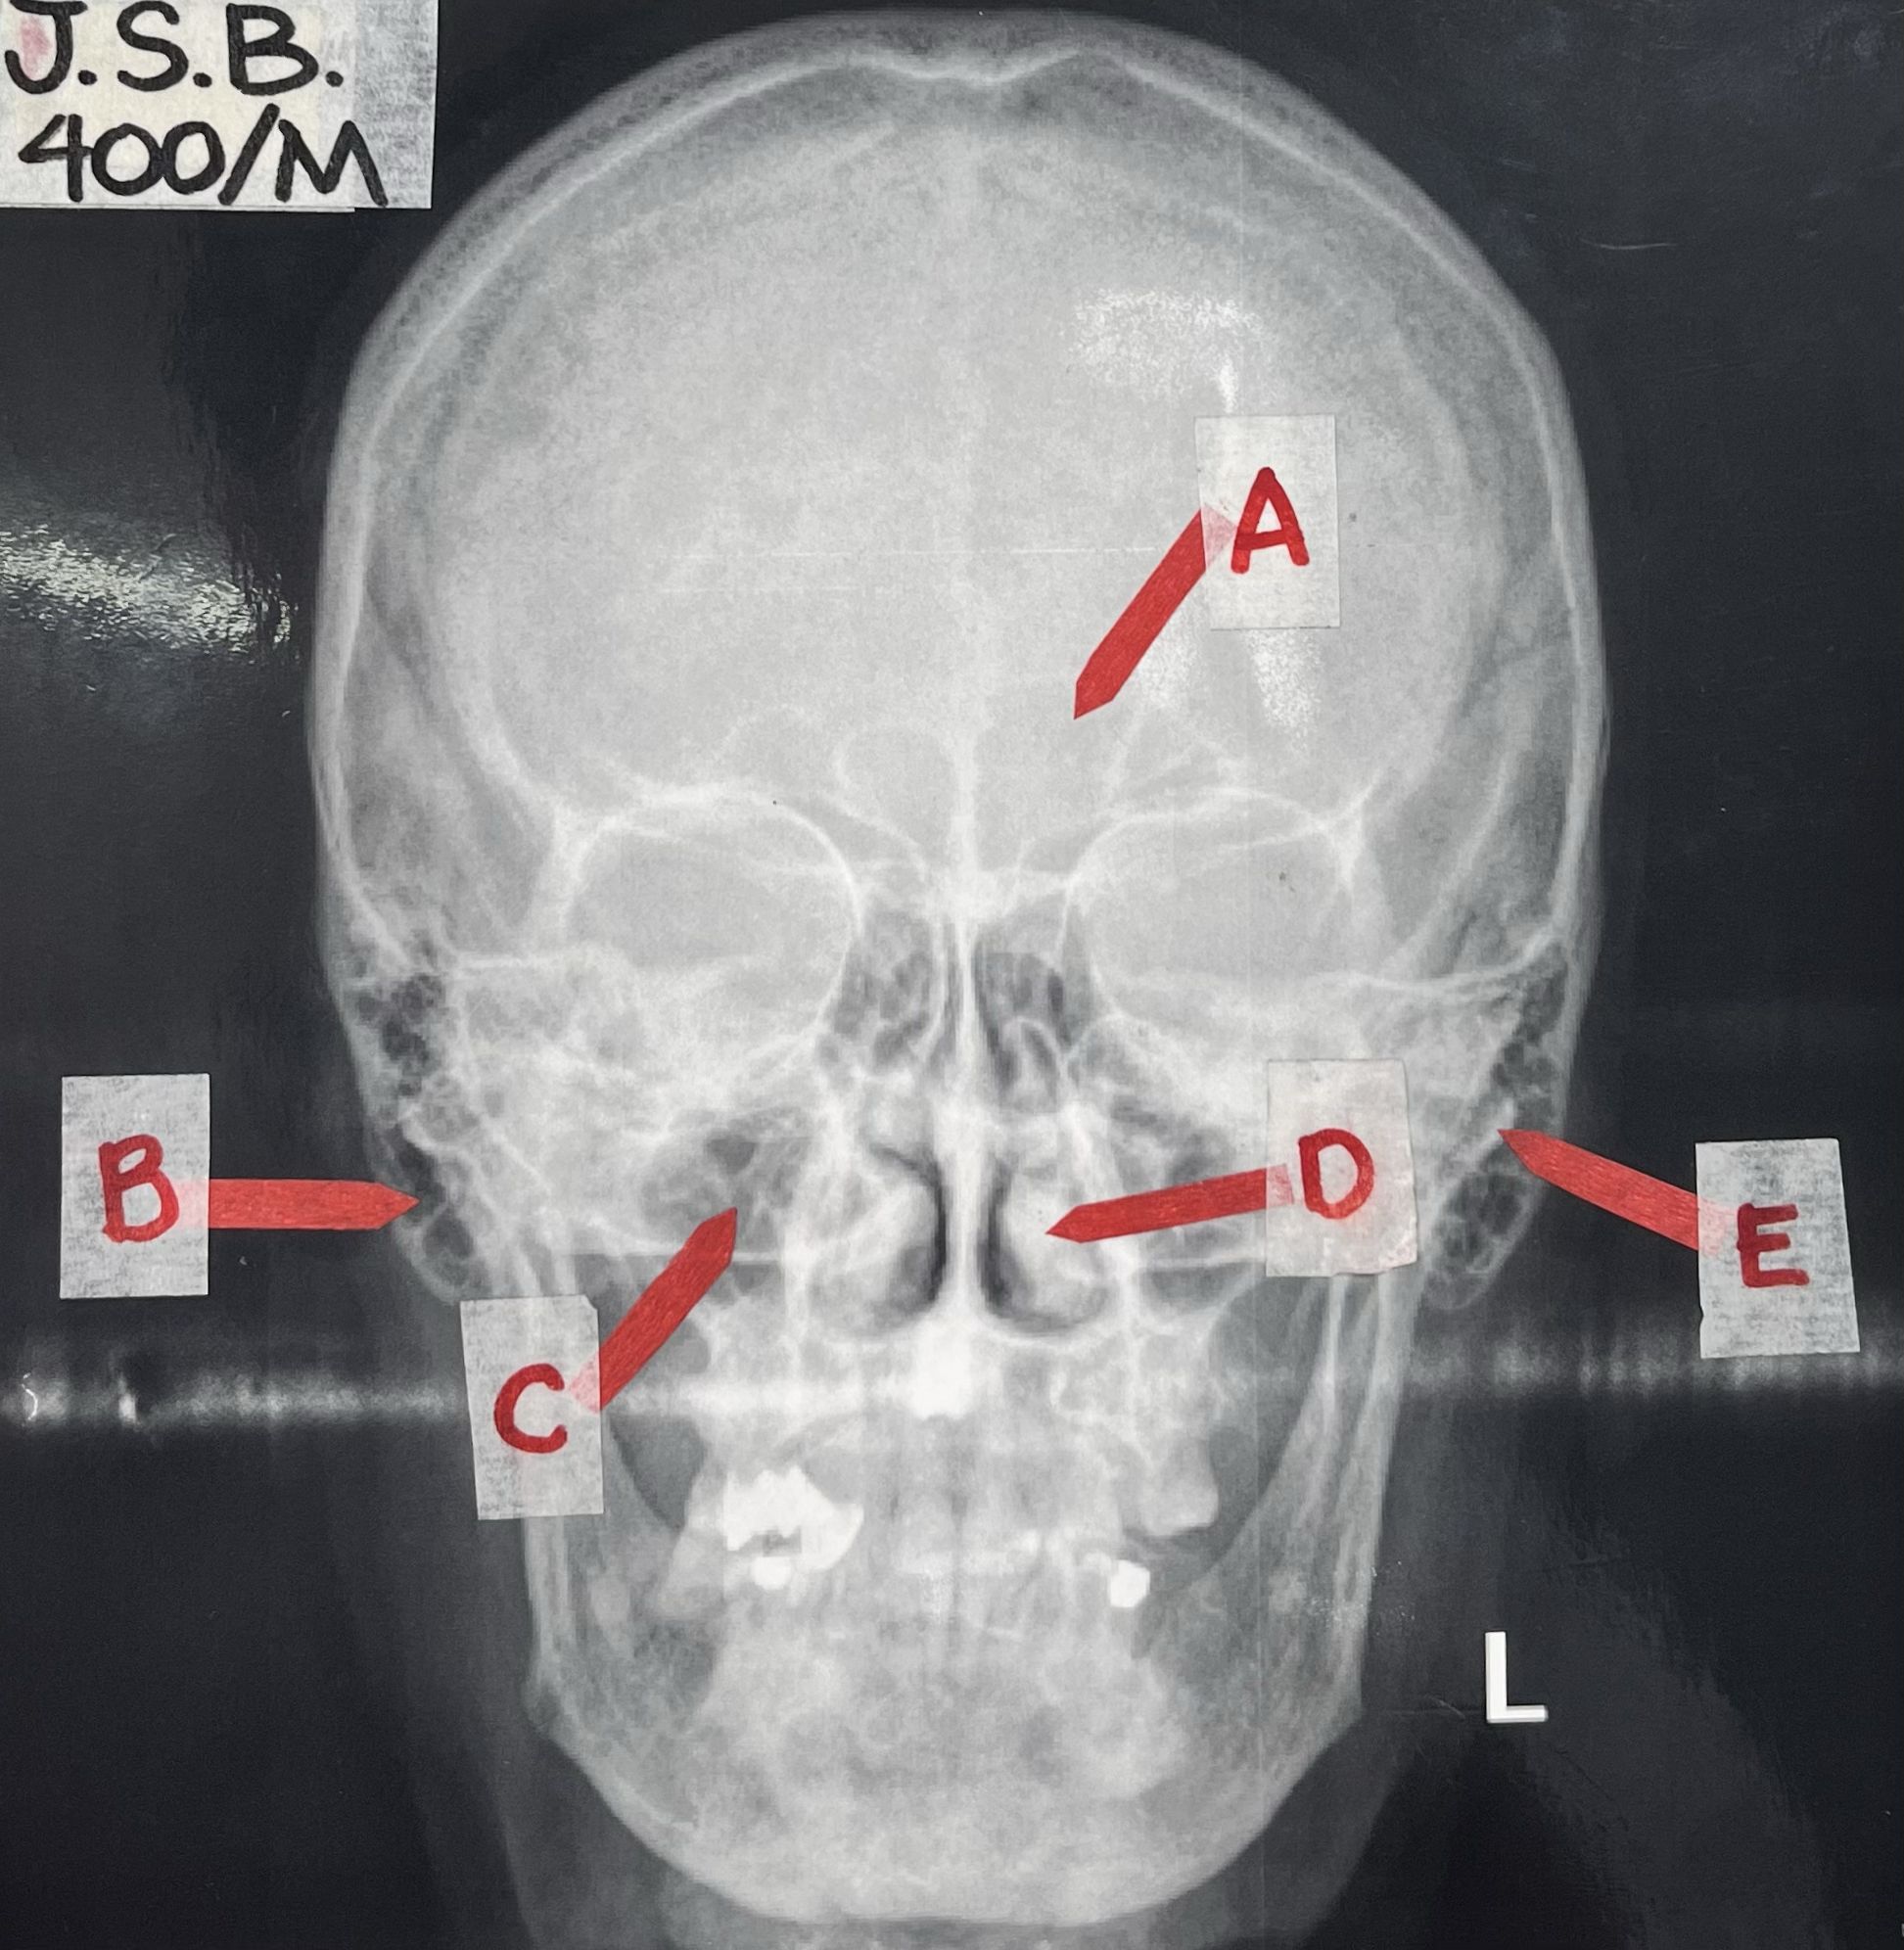
Anteroposterior (AP) Skull Radiograph

🟢 NORMAL
Diagnosis & Finding
Scalp Contusion / Subgaleal Hematoma (without bony fracture)
Symmetrical cranial vault. Petro-occipital ridges symmetrical. No linear radiolucencies traversing cortical margins.
Case 2: Jinu's Stage Rehearsal Fall
🎯 Target Landmark Recognition Guide (A–E)
A Lesser Wing of Sphenoid (Sphenoid Ridge)
🎯 Quick Anchor Look across the upper half of the orbit on the frontal view.
🔍 How to Trace Follow the crisp, sharp, dense horizontal cortical shelf running transversely across the mid-upper orbit.
💡 Dead Giveaway Crisp horizontal white line marking the posterior border of the anterior cranial fossa.
⚠️ Don't Confuse With Do NOT confuse with the superior orbital margin (the eyebrow contour formed by the frontal bone higher up) or greater wing (which forms the lateral wall).
B Right Mastoid Process
🎯 Quick Anchor Look at the inferolateral corner of the temporal bone behind the ear on the patient's right side.
🔍 How to Trace Trace down from the dense petrous ridge to the downward-pointing conical projection.
💡 Dead Giveaway A rounded, conical downward bony projection filled with fine, spongy mastoid air cell trabeculae.
⚠️ Don't Confuse With Do NOT confuse with the styloid process (which is much thinner, medial, and needle-like) or the mandibular condyle.
C Right Maxillary Sinus
🎯 Quick Anchor Locate the cheek area below the right orbit and lateral to the nasal cavity.
🔍 How to Trace Trace the triangular / inverted pyramidal air cavity with sharp white cortical borders.
💡 Dead Giveaway Large symmetrical radiolucent air pocket inside the maxillary bone directly below the orbital floor.
⚠️ Don't Confuse With Do NOT confuse with the orbit above it (separated by the thin orbital floor) or nasal fossa medially.
D Nasal Septum
🎯 Quick Anchor Find the exact vertical midline of the facial skeleton between the two nasal cavities.
🔍 How to Trace Trace the vertical white bony/cartilaginous stripe running from the ethmoid down to the hard palate.
💡 Dead Giveaway Vertical midline bony partition formed by the perpendicular plate of the ethmoid bone superiorly and the vomer inferiorly.
⚠️ Don't Confuse With Do NOT confuse with the inferior nasal conchae, which curl inward from the lateral nasal walls on either side.
E Left External Acoustic Meatus (EAM)
🎯 Quick Anchor Look at the patient's left lateral temporal region, posterior to the condyle of the mandible.
🔍 How to Trace Identify the oval radiolucency cutting through the dense petrous bone.
💡 Dead Giveaway Smooth, rounded-to-oval dark opening representing the external ear canal.
⚠️ Don't Confuse With Do NOT confuse with the internal acoustic meatus (which is located higher on the petrous pyramid) or condylar fossa.
🗺️ Other Identifiable Structures on this View
6 Landmarks Listed
Structure Region / Bone Key Radiographic Recognition Cue
Sagittal Suture Midline Vault Dense serrated midline suture running between the left and right parietal bones.
Crista Galli & Cribriform Plate Ethmoid Midline Cockscomb midline vertical projection rising from the cribriform plate of ethmoid bone.
Petrous Ridge (Petrous Pyramid) Temporal Bone Dense triangular wedge of temporal bone housing inner ear structures; casts dense white bands across mid-face on AP views.
Inferior Orbital Rim Zygomatic / Maxilla Continuous curved cortical lower margin of the orbit; check for step-offs in zygomaticomaxillary complex fractures.
Ethmoid Sinuses Inter-orbital Cluster of small honeycomb air cells between the orbits and superior nasal cavity.
Mandibular Ramus & Angle Mandible Broad vertical plate and posteroinferior angle of the lower jaw.
📋 Clinical & Radiologic Pearls
Technical Note on AP Skull: The dense petrous ridges superimpose directly over the lower half of the orbits, obscuring fine orbital floor and maxillary detail. When facial fractures are suspected, a Waters view (occipitomental) is the standard projection.
Observation Protocol: A patient with GCS 15, normal cranial nerves, and isolated scalp hematoma can be discharged with head injury warning precautions (vomiting, worsening headache, confusion).
Abby Saja
HUNTR-03 Heavy Assault · Iron Fist Brawler

Case 3: Abby Saja's Weightlifting Injury

Station 3 Group 4 & Group 9 Abby Saja, 28-year-old Male

Dropped a heavy barbell onto the back of his neck during squats.

Chief Complaint

Severe posterior neck pain, muscle spasms, guarded range of motion.

Physical Examination

Alert and oriented. Tenderness over lower cervical spinous processes. Motor strength 5/5 across all upper/lower extremity myotomes. Sensation intact. Deep tendon reflexes 2+ symmetrical.

Modality

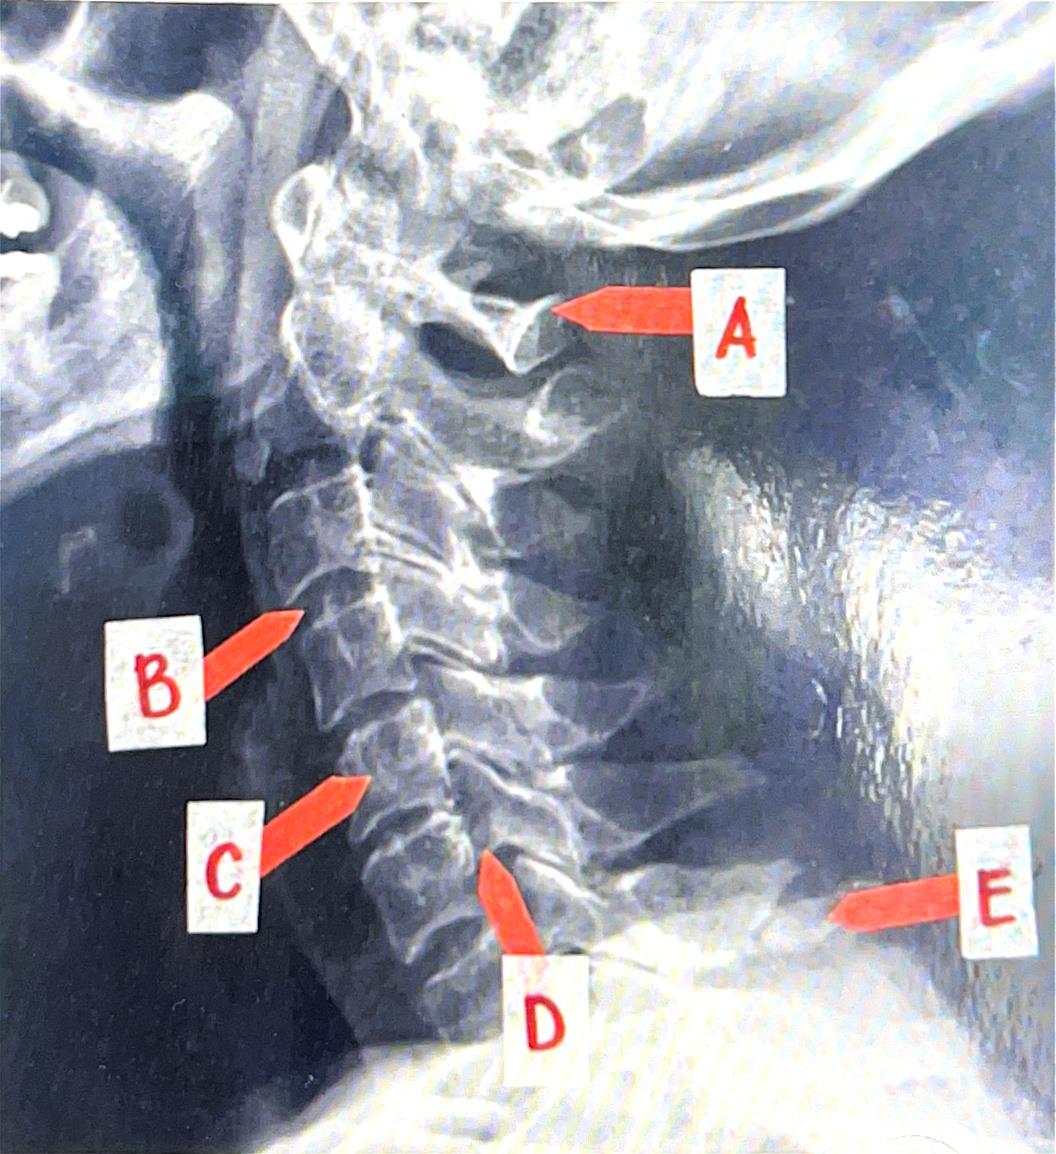
Lateral Cervical Spine Radiograph

🟢 NORMAL
Diagnosis & Finding
Acute Cervical Muscular Strain / Whiplash (no bony subluxation or fracture)
All 4 cervical parallel lines are smooth and unbroken. Normal lordotic curvature. Uniform disc spaces. Normal prevertebral soft tissue widths.
Case 3: Abby Saja's Weightlifting Injury
🎯 Target Landmark Recognition Guide (A–E)
A Spinous Process of Axis (C2)
🎯 Quick Anchor Start at the very top of the spinous process column directly behind the odontoid peg.
🔍 How to Trace Follow the posterior elements down from C1. C1 has NO true spinous process, so the first prominent bony spine you hit is C2.
💡 Dead Giveaway Massive, robust, hatchet-shaped spinous process, the largest and heaviest spine in the upper cervical column.
⚠️ Don't Confuse With Do NOT confuse with the posterior tubercle of C1 (small bump above it) or C3 spine (much smaller and thinner below it).
B Vertebral Body of C4
🎯 Quick Anchor Count vertebral bodies sequentially downward from C2 (which has the tall odontoid peg): C2 → C3 → C4.
🔍 How to Trace Follow the smooth anterior vertebral line; C4 is the 3rd rectangular block from the top.
💡 Dead Giveaway Symmetrical rectangular block of bone midway down the cervical curve with uniform height and intact cortical margins.
⚠️ Don't Confuse With Do NOT confuse with C3 (immediately above) or C5 (immediately below). Always count bodies in order starting from C2!
C Vertebral Body of C6
🎯 Quick Anchor Continue counting down the vertebral column: C4 → C5 → C6. C6 is the block directly above C7.
🔍 How to Trace Check the anterior and posterior cortical borders; they must form a smooth, continuous lordotic line with C5 and C7.
💡 Dead Giveaway Rectangular vertebral body situated directly above the vertebra with the largest horizontal spinous process (C7).
⚠️ Don't Confuse With Do NOT confuse with C7 (which often has overlapping shoulder shadows in muscular patients).
D Superior Articular Facet / Process of C7
🎯 Quick Anchor Look at the articular pillar column at the C6–C7 junction, between the vertebral body and the spinous process.
🔍 How to Trace Locate the sloping zygapophysial (facet) joint space. The upward-pointing bony slope of C7 is the superior facet.
💡 Dead Giveaway Smooth, upward-and-backward sloping articular surface forming the shingle-like facet joint with the inferior facet of C6.
⚠️ Don't Confuse With Do NOT confuse with the pedicle (which attaches the body to the pillar) or lamina (which connects the pillar to the spinous process).
E Spinous Process of C7 (Vertebra Prominens)
🎯 Quick Anchor Look at the posterior elements of the lower cervical spine near the base of the neck.
🔍 How to Trace Follow the spinous processes down to the longest, most horizontal backward projection.
💡 Dead Giveaway The longest and most prominent horizontal spinous process in the cervical spine (the palpable landmark at the base of the neck).
⚠️ Don't Confuse With Do NOT confuse with T1 (which slopes sharply downward) or C6 (which is noticeably shorter and more horizontal).
🗺️ Other Identifiable Structures on this View
6 Landmarks Listed
Structure Region / Bone Key Radiographic Recognition Cue
The 4 Cervical Parallel Lines C-Spine Alignment 1) Anterior Vertebral Line, 2) Posterior Vertebral Line, 3) Spinolaminar Line, 4) Posterior Spinous Line. Must all form smooth, unbroken lordotic curves.
Lamina of C5 Posterior Elements Broad flattened plate of bone connecting the articular pillar to the base of the spinous process.
Atlas (C1) Anterior & Posterior Arches Upper C-Spine Ring-shaped atypical vertebra without a body; anterior arch articulates with the dens (atlanto-dens interval must be ≤3 mm in adults).
Dens / Odontoid Process of C2 Upper C-Spine Upward vertical tooth-like peg of C2 acting as the pivot for head rotation.
Zygapophysial (Facet) Joints Articular Pillars Synovial joints between superior and inferior articular facets; joint spaces must be uniform without widening or perched facets.
Prevertebral Soft Tissues Anterior Neck Normal width: ≤7 mm at C2–C4; ≤22 mm at C6–C7. Widening indicates prevertebral hematoma from occult fracture.
📋 Clinical & Radiologic Pearls
Search Pattern (ABCDEF): Alignment (4 parallel lines) → Bones (trace all cortical edges) → Cartilage/Joints (intervertebral spaces) → Disc spaces → Soft tissue (prevertebral spaces).
Adequacy Requirement: A trauma cervical spine series is inadequate unless all 7 cervical vertebrae and the C7–T1 junction are fully visualized.
Zoey
HUNTR-04 Vanguard Tactician · Aegis Defender

Case 4: Zoey's Battle Slam Injury

Station 4 Group 10 Zoey, 22-year-old Female

Direct heavy impact to the lateral left shoulder during battle combat.

Chief Complaint

Severe left shoulder pain, inability to abduct or elevate left arm, focal shoulder swelling.

Physical Examination

Left arm held adducted against chest. Focal bony tenderness and step-off over the distal clavicle. Skin intact but tenting. Radial pulses 2+ intact. Sensation intact over the axillary nerve patch (regimental badge area).

Modality

AP Left Clavicle & Shoulder Radiograph
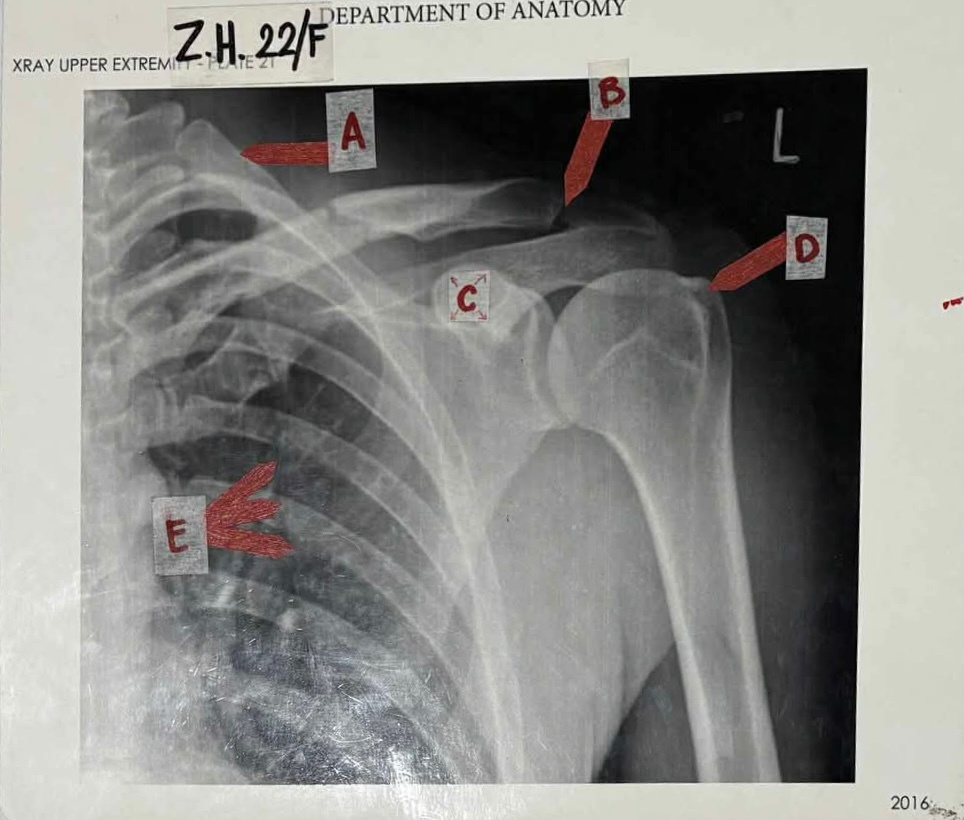
🔴 ABNORMAL
Diagnosis & Finding
Closed Complete Oblique Fracture of the Distal Third of the Left Clavicle (Allman Type II / Neer Group II)
Cortical disruption and complete oblique fracture line traversing the lateral (distal) third of the left clavicle. Moderate displacement with cranial pull of the medial fragment by the sternocleidomastoid muscle.
Case 4: Zoey's Battle Slam Injury
🎯 Target Landmark Recognition Guide (A–E)
A Sternal End of Left Clavicle
🎯 Quick Anchor Follow the clavicle bone all the way medially toward the midline of the chest.
🔍 How to Trace Trace along the gentle S-curve of the clavicular shaft to its expanded medial terminus.
💡 Dead Giveaway Flared, bulbous medial end articulating with the manubrium sterni at the sternoclavicular joint.
⚠️ Don't Confuse With Do NOT confuse with the 1st rib (which arches underneath the clavicle) or the manubrium itself.
B Acromioclavicular (AC) Joint
🎯 Quick Anchor Follow the clavicle laterally to the very tip of the shoulder.
🔍 How to Trace Find where the flattened distal clavicle meets the acromion process of the scapula.
💡 Dead Giveaway Vertical radiolucent joint space between distal clavicle and acromion (normal joint space ≤5–8 mm).
⚠️ Don't Confuse With Do NOT confuse with the fracture line! The AC joint is an anatomical joint line with smooth cortical margins; the fracture is medial to it with jagged edges.
C Coracoid Process of Left Scapula
🎯 Quick Anchor Look immediately inferior to the lateral third of the clavicle and medial to the humeral head.
🔍 How to Trace Identify the hook-shaped bony prominence rising from the superior neck of the scapula.
💡 Dead Giveaway Projects anterolaterally like a bent finger or raven's beak; appears on AP view as a dense rounded ring or curved beak.
⚠️ Don't Confuse With Do NOT confuse with the acromion (which sits higher and more laterally, forming the roof of the shoulder).
D Greater Tubercle of Left Humerus
🎯 Quick Anchor Locate the lateral border of the proximal humerus, just lateral to the humeral head.
🔍 How to Trace On an AP view with arm in anatomical position, trace the outermost lateral contour of the proximal humerus.
💡 Dead Giveaway The prominent lateral bony mound where the rotator cuff muscles (supraspinatus, infraspinatus, teres minor) insert.
⚠️ Don't Confuse With Do NOT confuse with the lesser tubercle (which projects anteriorly and medially, separated by the bicipital groove).
E Left Ribs (Posterior Ribs)
🎯 Quick Anchor Look medial to the scapular blade, underlying the lung field.
🔍 How to Trace Trace the curved bony bands arching across the hemithorax.
💡 Dead Giveaway Posterior ribs run nearly horizontally with crisp cortical margins; anterior ribs slope downward and medially toward the sternum.
⚠️ Don't Confuse With Do NOT mistake rib shadows for scapular fracture lines. Always trace the smooth unbroken border of each individual rib.
🗺️ Other Identifiable Structures on this View
7 Landmarks Listed
Structure Region / Bone Key Radiographic Recognition Cue
Acromion of Left Scapula Shoulder Girdle Broad, flattened lateral expansion of the scapular spine forming the summit of the shoulder.
Glenoid Fossa (Cavity) Scapula Shallow, pear-shaped articular socket of the scapula receiving the humeral head to form the glenohumeral joint.
Anatomical Neck of Humerus Proximal Humerus Groove circumscribing the humeral head immediately adjacent to the articular cartilage (distinguish from surgical neck below tubercles).
Lesser Tubercle of Humerus Proximal Humerus Smaller anterior bony prominence providing insertion for the subscapularis muscle.
Intertubercular (Bicipital) Sulcus Proximal Humerus Vertical furrow between greater and lesser tubercles housing the long head of the biceps tendon.
Conoid Tubercle of Clavicle Distal Clavicle Roughened bony tubercle on the posteroinferior surface of the distal clavicle for attachment of the conoid ligament.
Inferior Angle of Scapula Scapula Lowest point of the triangular scapular body, overlying roughly the 7th or 8th rib.
📋 Clinical & Radiologic Pearls
Displacement Biomechanics: The medial clavicle fragment is pulled superiorly and posteriorly by the sternocleidomastoid (SCM) muscle, while the lateral fragment is dragged downward and inward by the weight of the arm and pectoralis major.
Neurovascular Safety: Always document distal pulses (radial, ulnar) and check the axillary nerve sensation before and after sling immobilization.
Healer Han
HUNTR-05 Chief Medical Officer · Combat Medic

Case 5: Healer Han's Pickleball Elbow

Station 5 Group 12 & Group 17 Healer Han, 56-year-old Male

Sudden sharp pop in his right elbow after repeated backhand swings during a pickleball match.

Chief Complaint

Severe lateral elbow pain, weakness gripping objects or turning doorknobs.

Physical Examination

Exquisite point tenderness over the lateral epicondyle of the humerus. Pain reproduced with resisted wrist extension and middle finger extension (Cozen test and Maudsley test positive). Passive elbow flexion/extension full. No joint effusion.

Modality

AP and Lateral Radiographs of Right Elbow
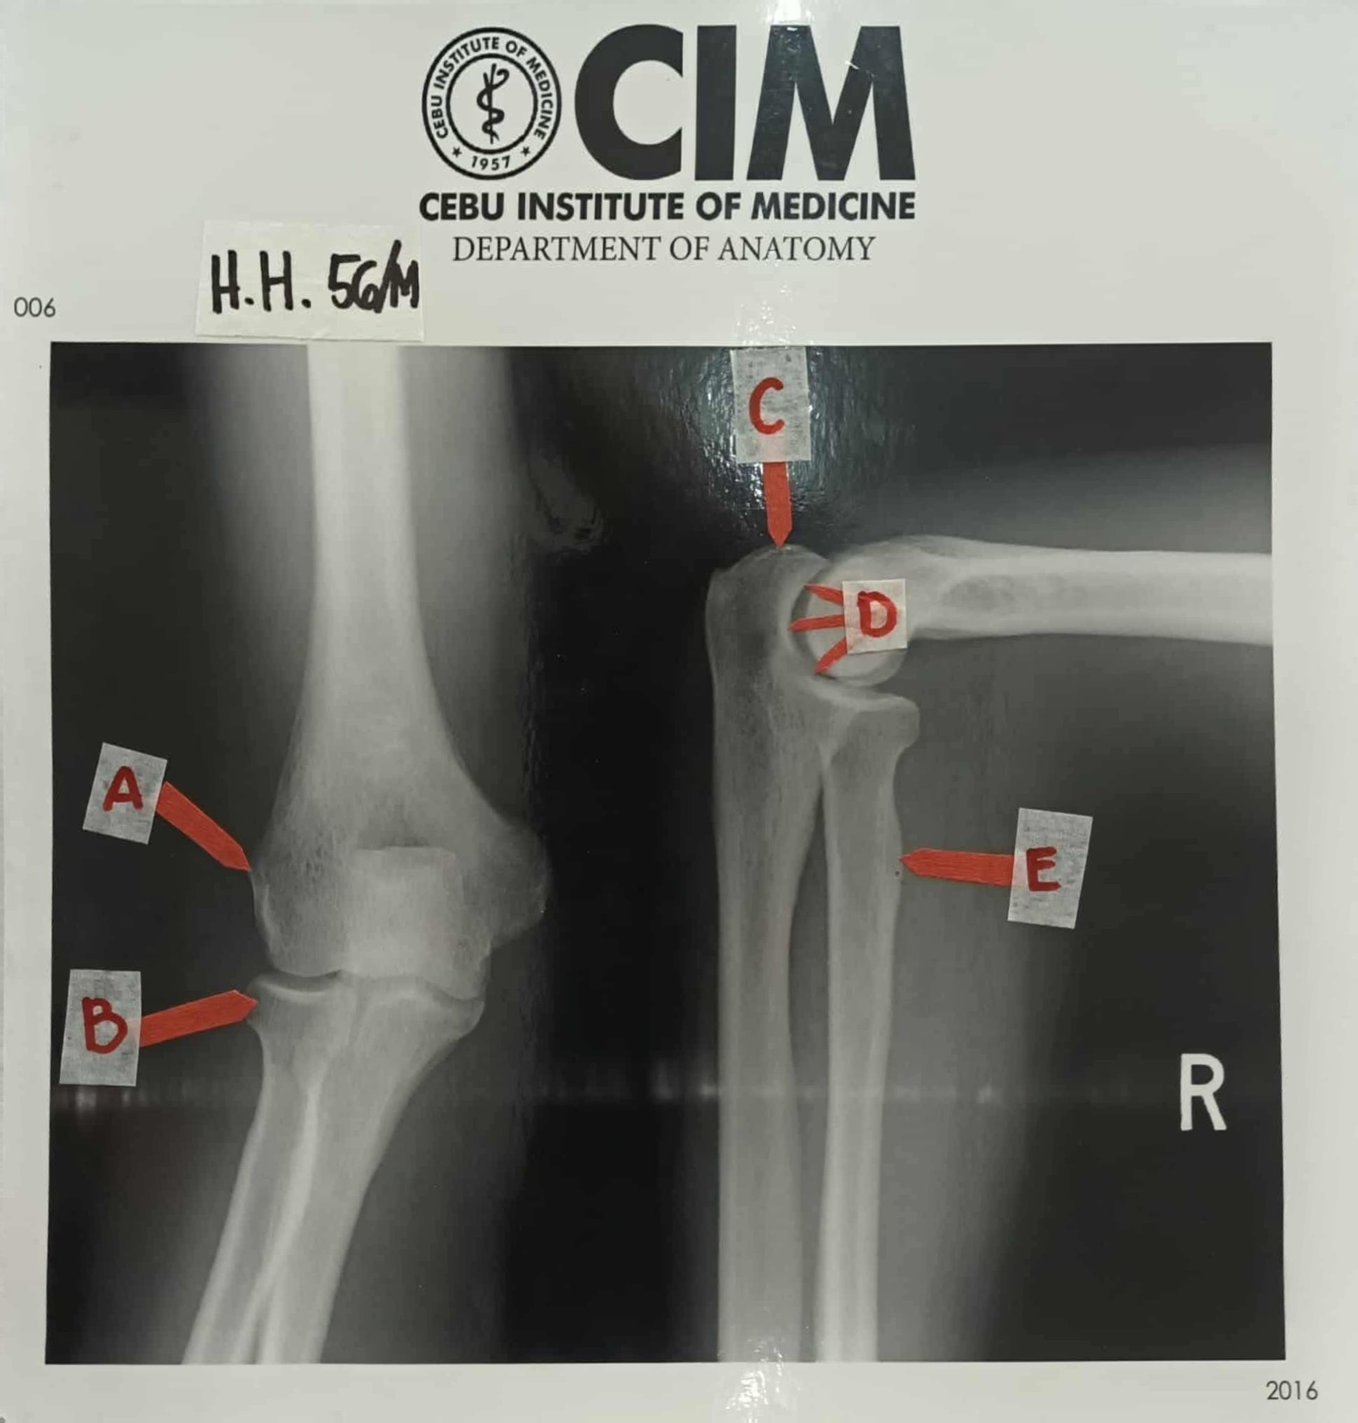
🟢 NORMAL
Diagnosis & Finding
Lateral Epicondylitis ('Tennis / Pickleball Elbow' - Extensor Carpi Radialis Brevis tendinopathy)
Intact cortical surfaces of distal humerus, radius, and ulna. Radio-capitellar line and anterior humeral line are aligned. No posterior fat pad sign (no occult intra-articular fracture).
Case 5: Healer Han's Pickleball Elbow
🎯 Target Landmark Recognition Guide (A–E)
A Lateral Epicondyle of Right Humerus
🎯 Quick Anchor On the AP view, trace down the lateral border of the humerus shaft (aligned with the radius).
🔍 How to Trace Locate the bony flare sitting directly above the rounded capitulum on the lateral side.
💡 Dead Giveaway The lateral supracondylar ridge terminates in this knobby flare, the origin of the common extensor tendon.
⚠️ Don't Confuse With Do NOT confuse with the medial epicondyle (which is much larger, more pronounced, and projects prominently on the ulnar side).
B Head of Right Radius
🎯 Quick Anchor On the AP or lateral view, identify the radius bone and trace it proximally toward the joint line.
🔍 How to Trace Look directly beneath the rounded capitulum of the humerus.
💡 Dead Giveaway Cylindrical, flat-topped disc resembling a hockey puck or shallow golf tee with a concave superior articular surface.
⚠️ Don't Confuse With Do NOT confuse with the radial neck (the constricted narrowing directly beneath the head) or coronoid process of ulna.
C Olecranon of Right Ulna
🎯 Quick Anchor On the LATERAL view, look at the very tip of the elbow point at the posterior aspect of the joint.
🔍 How to Trace Trace up the posterior shaft of the ulna to the large curved bony hook capping the joint.
💡 Dead Giveaway The massive, robust beak-like proximal process of the ulna that fits into the olecranon fossa during extension (insertion of triceps).
⚠️ Don't Confuse With Do NOT confuse with the coronoid process (which is the smaller anterior beak of the ulna pointing forward into the joint).
D Trochlear Notch (Semilunar Notch) of Right Ulna
🎯 Quick Anchor On the LATERAL view, look at the deep C-shaped articular scoop between the olecranon and coronoid process.
🔍 How to Trace Follow the deep concave articular cavity that wraps around the spool-shaped humeral trochlea.
💡 Dead Giveaway Deep 180-degree C-shaped socket grasping the round spool of the trochlea like an open wrench.
⚠️ Don't Confuse With Do NOT confuse with the radial notch (a small lateral facet on the ulna articulating with the radial head).
E Radial Tuberosity of Right Radius
🎯 Quick Anchor On the LATERAL or AP view, look 1–2 cm distal to the radial neck on the medial aspect of the shaft.
🔍 How to Trace Trace down past the constricted radial neck to find an oval, roughened bony mound pointing toward the ulna.
💡 Dead Giveaway Oval bony elevation on the anteromedial surface of the radius where the biceps brachii tendon inserts.
⚠️ Don't Confuse With Do NOT mistake for an avulsion fracture or osteophyte. It is a normal anatomical prominence that rotates with pronation/supination.
🗺️ Other Identifiable Structures on this View
7 Landmarks Listed
Structure Region / Bone Key Radiographic Recognition Cue
Capitulum of Humerus Distal Humerus (Lateral) Smooth rounded hemisphere articulating exclusively with the concave head of the radius.
Trochlea of Humerus Distal Humerus (Medial) Spool-shaped pulley articulating with the deep trochlear notch of the ulna.
Coronoid Process of Ulna Proximal Ulna Anterior triangular beak of the ulna that prevents posterior elbow dislocation.
Olecranon Fossa Distal Humerus (Posterior) Deep posterior depression above trochlea that receives olecranon during full extension; appears as a central lucency on AP views.
Coronoid Fossa & Radial Fossa Distal Humerus (Anterior) Depressions on anterior humerus accommodating the coronoid process and radial head during full flexion.
Medial Epicondyle Distal Humerus (Medial) Prominent medial projection (origin of common flexor tendon; ulnar nerve runs immediately posterior in cubital tunnel).
Radio-Capitellar Alignment Line Radiographic Alignment A straight line drawn down the center of the radial shaft must bisect the capitulum on EVERY view.
📋 Clinical & Radiologic Pearls
Radiologic Alignment Rules: 1) Radio-capitellar line must bisect the capitulum on all views (rules out radial head dislocation / Monteggia lesion). 2) Anterior humeral line on true lateral must pass through the middle third of the capitulum (rules out supracondylar fracture).
Fat Pad Signs: A visible posterior fat pad is ALWAYS abnormal and signifies intra-articular hemorrhage from an occult fracture (radial head in adults, supracondylar in children).
Baby Saja
HUNTR-06 Berserker Assault · Shadow Striker

Case 6: Baby Saja's Wall Punching Injury

Station 6 Group 7 & Group 18 Baby Saja, 20-year-old Male

Punched a concrete wall in anger following an argument.

Chief Complaint

Severe pain, swelling, and ecchymosis over the dorsum of the right hand and ulnar border.

Physical Examination

Swelling and localized tenderness over the neck of the 5th metacarpal. Flattening of the 5th knuckle profile when making a fist. No rotational malalignment (all fingers point toward the scaphoid tubercle on partial flexion). Sensation intact.

Modality

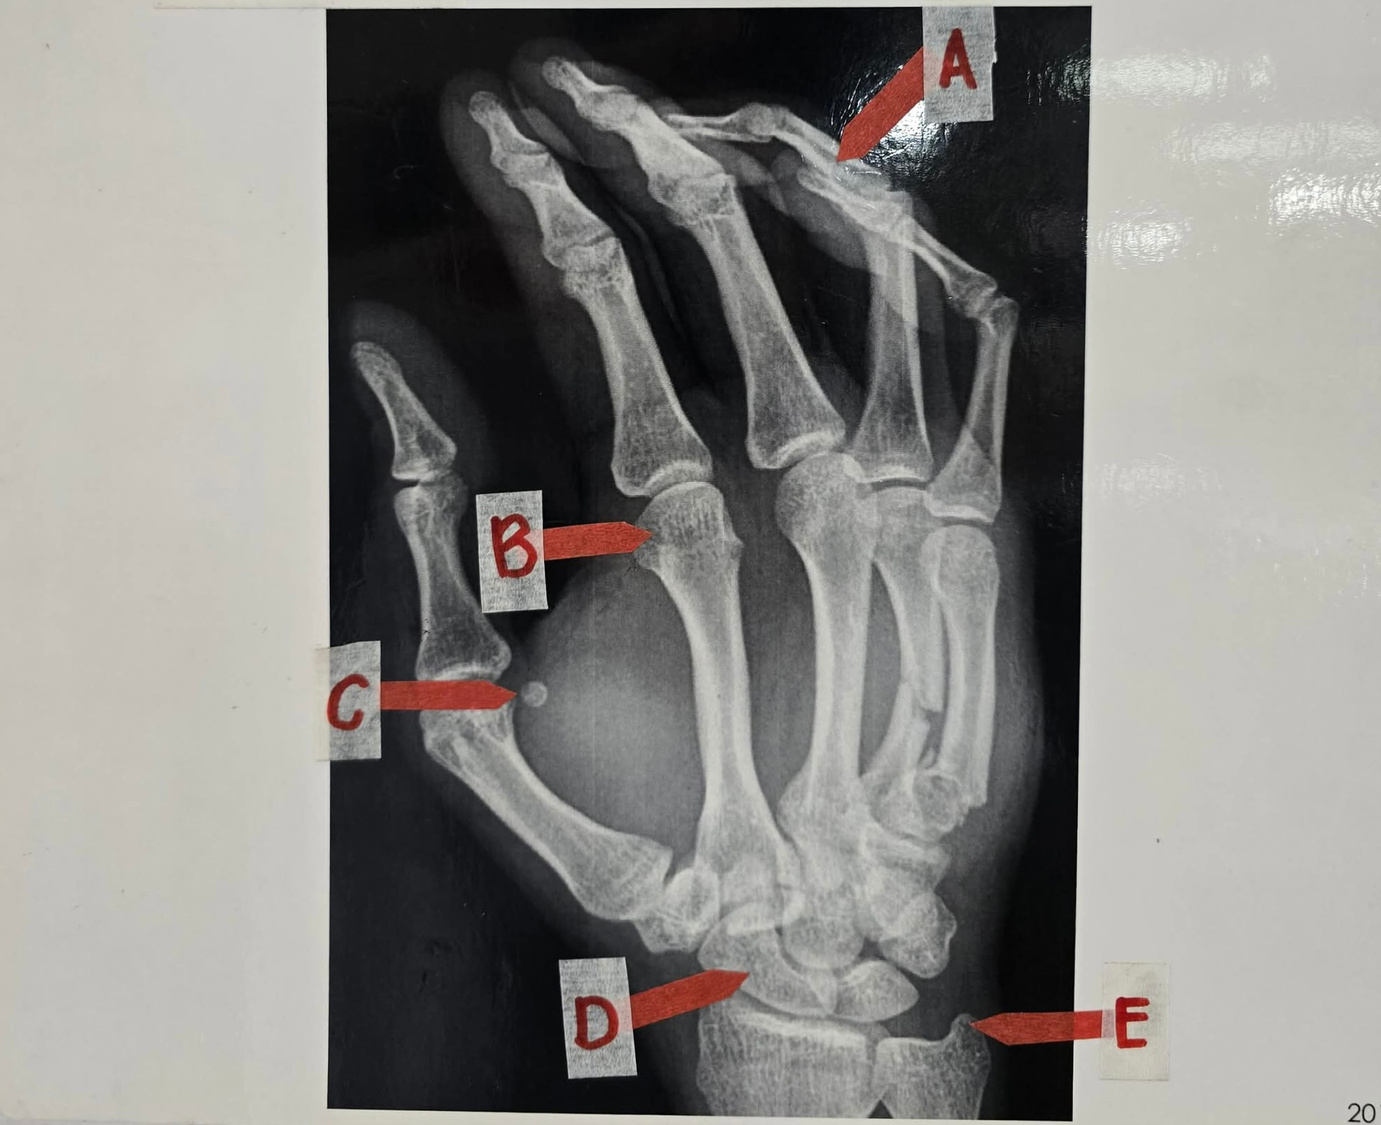
PA / Oblique Radiograph of Right Hand

🔴 ABNORMAL
Diagnosis & Finding
Boxer's Fracture (Fracture of the 5th Metacarpal Neck)
Complete transverse fracture through the neck of the 5th metacarpal with volar (palmar) angulation of the distal metacarpal head.
Case 6: Baby Saja's Wall Punching Injury
🎯 Target Landmark Recognition Guide (A–E)
A Middle Phalanx of the 4th Digit (Ring Finger)
🎯 Quick Anchor Count fingers starting from the thumb (1 = Thumb, 2 = Index, 3 = Middle, 4 = Ring, 5 = Little). Locate the 4th digit.
🔍 How to Trace Identify the 3 phalanges of the finger: Proximal phalanx (base), Middle phalanx (center), Distal phalanx (tip).
💡 Dead Giveaway The intermediate tubular bone of the ring finger with a flared base, slender shaft, and bicondylar head.
⚠️ Don't Confuse With Do NOT confuse with the proximal phalanx (which is longer and articulates with the metacarpal head) or thumb (thumb has NO middle phalanx!).
B Head of the 2nd Metacarpal (Index Knuckle)
🎯 Quick Anchor Follow the index finger down to where the finger meets the palm.
🔍 How to Trace Trace the long tubular 2nd metacarpal distally to its rounded, convex articular end.
💡 Dead Giveaway The large, smooth rounded knuckle surface forming the 2nd metacarpophalangeal (MCP) joint.
⚠️ Don't Confuse With Do NOT confuse with the 2nd metacarpal base (which is down at the wrist) or the 5th metacarpal neck (where the boxer's fracture is located!).
C Sesamoid Bone of the 1st Metacarpophalangeal (MCP) Joint
🎯 Quick Anchor Look at the base of the thumb at the 1st MCP joint.
🔍 How to Trace Look along the palmar borders of the 1st metacarpal head for small rounded bone densities embedded in the flexor pollicis brevis / adductor tendons.
💡 Dead Giveaway Tiny, rounded, smooth, corticalized bone pebble floating directly beside the thumb MCP joint.
⚠️ Don't Confuse With Do NOT confuse with an avulsion fracture fragment! Sesamoids are smooth, rounded, bilateral, and have completely intact cortical borders without sharp jagged edges.
D Scaphoid Bone of the Right Carpus
🎯 Quick Anchor Look at the proximal carpal row on the radial (thumb) side, directly articulating with the distal radius.
🔍 How to Trace Follow the distal radius articular facet into the wrist; the scaphoid is the large boat-shaped bone seated in the radial fossa.
💡 Dead Giveaway Cashew-nut or boat-shaped carpal bone that bridges the proximal and distal carpal rows.
⚠️ Don't Confuse With Do NOT confuse with the lunate (which sits medially in the center of the wrist) or trapezium (which is in the distal row under the thumb metacarpal).
E Styloid Process of Right Ulna
🎯 Quick Anchor Follow the ulna shaft (pinky side) distally to the wrist joint.
🔍 How to Trace Look at the medial and posterior tip of the distal ulnar head.
💡 Dead Giveaway Small, pointed, conical projection extending distally from the medial aspect of the ulnar head (attachment for ulnar collateral ligament and TFCC).
⚠️ Don't Confuse With Do NOT confuse with the radial styloid process (which is on the opposite thumb side and extends much further distally).
🗺️ Other Identifiable Structures on this View
6 Landmarks Listed
Structure Region / Bone Key Radiographic Recognition Cue
Proximal Carpal Row (Lateral to Medial) Carpus Scaphoid → Lunate → Triquetrum → Pisiform (mnemonic: Some Lovers Try Positions).
Distal Carpal Row (Lateral to Medial) Carpus Trapezium → Trapezoid → Capitate → Hamate (mnemonic: That They Can't Handle).
Hook of Hamate (Hamulus) Distal Carpal Row Curved anterior projection on ulnar side of carpus; forms lateral wall of Guyon's canal (ulnar nerve/artery).
Lunate Bone Proximal Carpal Row Crescent-shaped carpal bone articulating with distal radius and capitate; most frequently dislocated carpal bone.
1st Metacarpal & Trapeziometacarpal Joint Thumb Ray Saddle joint providing wide circumduction and opposability to the thumb.
Ulnar Styloid & Distal Radioulnar Joint (DRUJ) Wrist Joint Pivot joint between ulnar notch of radius and ulnar head allowing forearm pronation and supination.
📋 Clinical & Radiologic Pearls
Boxer's Fracture Management: Up to 30°–40° of volar angulation is clinically acceptable in the 5th metacarpal because the 5th CMC joint has high compensatory mobility (~20°–30° flexion/extension).
Rotational Malalignment Rule: Any degree of rotational overlap (fingers crossing over each other when making a fist) requires reduction because it does NOT remodel with time.
Celine
HUNTR-07 Siren Lead · Sonic Resonance Specialist

Case 7: Celine's Post-Concert Hip Pain

Station 7 Group 3 & Group 6 Celine, 52-year-old Female

Slipped and fell forcefully onto her right hip on a wet stage floor.

Chief Complaint

Severe right groin and anterior hip pain, total inability to bear weight on the right leg.

Physical Examination

Marked tenderness on palpation over the right superior pubic ramus and groin. Right lower extremity is NOT shortened or externally rotated. Pain aggravated by gentle pelvic compression. Distal pulses (femoral, dorsalis pedis) 2+ intact. Sensation intact.

Modality

Anteroposterior (AP) Pelvis Radiograph
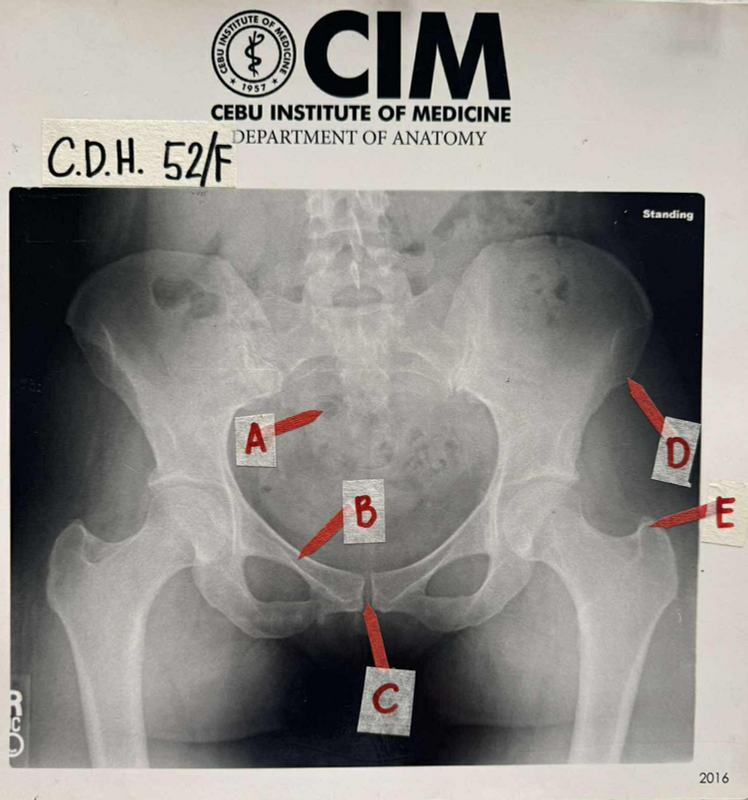
🔴 ABNORMAL
Diagnosis & Finding
Isolated Closed Fracture of the Right Superior Pubic Ramus (Low-energy fragility / insufficiency pelvic ring fracture)
Sharp radiolucent cortical disruption traversing the right superior pubic ramus with mild cortical step-off. Bony ring of pelvis intact elsewhere (isolated ramus fracture, stable pelvic fracture).
Case 7: Celine's Post-Concert Hip Pain
🎯 Target Landmark Recognition Guide (A–E)
A Right Anterior Sacral Foramen
🎯 Quick Anchor Look at the sacrum in the central pelvis between the two sacroiliac (SI) joints.
🔍 How to Trace Scan the paired vertical columns of rounded dark openings traversing the sacral ala.
💡 Dead Giveaway Smooth, paired round-to-oval radiolucent holes through which the ventral primary rami of sacral nerves exit.
⚠️ Don't Confuse With Do NOT confuse with bowel gas! Bowel gas has irregular, shifting bubbly borders; sacral foramina are symmetrical, fixed, and cortically rimmed.
B Right Superior Pubic Ramus (FRACTURE SITE!)
🎯 Quick Anchor Find the pubic symphysis in the lower midline and trace the upper bony strut outwards toward the hip socket.
🔍 How to Trace Follow the superior bony roof of the obturator foramen toward the acetabulum.
💡 Dead Giveaway The upper horizontal strut of the pubic bone. Look closely at Celine's film to spot the jagged black fracture line and cortical step-off!
⚠️ Don't Confuse With Do NOT confuse with the inferior pubic ramus, which forms the lower boundary of the obturator ring running down to the ischium.
C Pubic Symphysis
🎯 Quick Anchor Look at the exact inferior midline of the pelvic ring.
🔍 How to Trace Find where the left and right pubic bodies meet in the center.
💡 Dead Giveaway Vertical radiolucent fibrocartilaginous joint space separating the pubic bodies (normal anatomical gap is 4–5 mm wide).
⚠️ Don't Confuse With Do NOT mistake for a fracture! The symphysis has smooth, dense cortical subchondral bone plates on both opposing sides.
D Left Anterior Superior Iliac Spine (ASIS)
🎯 Quick Anchor Follow the wide, curved iliac crest forward and downward along the upper outer pelvis.
🔍 How to Trace Trace the outer margin of the iliac wing until it terminates at its sharp anterior corner.
💡 Dead Giveaway Prominent anterior corner at the terminal end of the iliac crest (origin of the sartorius muscle and inguinal ligament).
⚠️ Don't Confuse With Do NOT confuse with the AIIS (Anterior Inferior Iliac Spine), which sits 2–3 cm lower just above the acetabular rim.
E Left Greater Trochanter of Femur
🎯 Quick Anchor Locate the proximal femur and hip joint on the patient's left.
🔍 How to Trace From the femoral shaft, trace upward along the outer lateral contour.
💡 Dead Giveaway Large, quadrangular, rugged lateral bony mass projecting superiorly and laterally at the neck-shaft junction (insertion of gluteus medius & minimus).
⚠️ Don't Confuse With Do NOT confuse with the lesser trochanter (which is a smaller conical bump projecting posteromedially on the inner femur).
🗺️ Other Identifiable Structures on this View
7 Landmarks Listed
Structure Region / Bone Key Radiographic Recognition Cue
Sacroiliac (SI) Joint Pelvic Ring Strong synovial/syndesmotic joint between sacrum and iliac wings transmitting upper body weight to lower limbs.
Obturator Foramen Anterior Pelvis Large oval/triangular opening bounded by ischium and pubis, covered by obturator membrane (spares obturator canal for vessels/nerve).
Ischial Tuberosity Inferior Pelvis Heavy, rough posteroinferior bony prominence that bears body weight when sitting (origin of hamstring muscles).
Acetabulum & Lunate Surface Hip Joint Deep cup-like socket formed by ilium, ischium, and pubis; articulates with femoral head.
Femoral Head & Fovea Capitis Proximal Femur Smooth spherical head fitting into acetabulum; fovea is the small central pit for the ligamentum teres.
Femoral Neck Proximal Femur Constricted bridge connecting femoral head to shaft; critical site for intracapsular subcapital fractures in elderly osteoporotic patients.
Shenton's Line Radiographic Alignment Continuous smooth imaginary arch drawn along the inferior border of the superior pubic ramus and medial femoral neck. Interruption indicates hip fracture or dislocation.
📋 Clinical & Radiologic Pearls
Pelvic Ring Biomechanics: The pelvic ring is like a rigid pretzel. If you see a displaced fracture in one place (e.g. pubic ramus), ALWAYS scrutinize the posterior ring (sacrum, SI joints) for a second break or widening.
Stability & Treatment: Isolated pubic ramus fractures in older adults are mechanically stable (intact posterior ring) and are managed conservatively with early weight-bearing as tolerated, analgesia, and DVT prophylaxis.
Bobby
HUNTR-08 Tactical Ops Commander · Quartermaster

Case 8: Bobby's Organizer Knee Overuse

Station 8 Group 2 Bobby, 40-year-old Male

Managed and organized the entire multi-day concert event, running continuously up and down stage ramps and concrete stairs.

Chief Complaint

Recurrent dull, aching anterior right knee pain, aggravated by walking down stairs and sitting with knees bent for long periods ('movie-theater sign').

Physical Examination

Tenderness on palpation along the retro-patellar borders. Pain and fine crepitus elicited with patellar grinding / compression test (Clarke's test). No joint effusion, no ligamentous laxity (negative anterior/posterior drawer, negative Lachman, negative varus/valgus stress). Normal ranges of motion.

Modality

AP and Lateral Radiographs of Right Knee
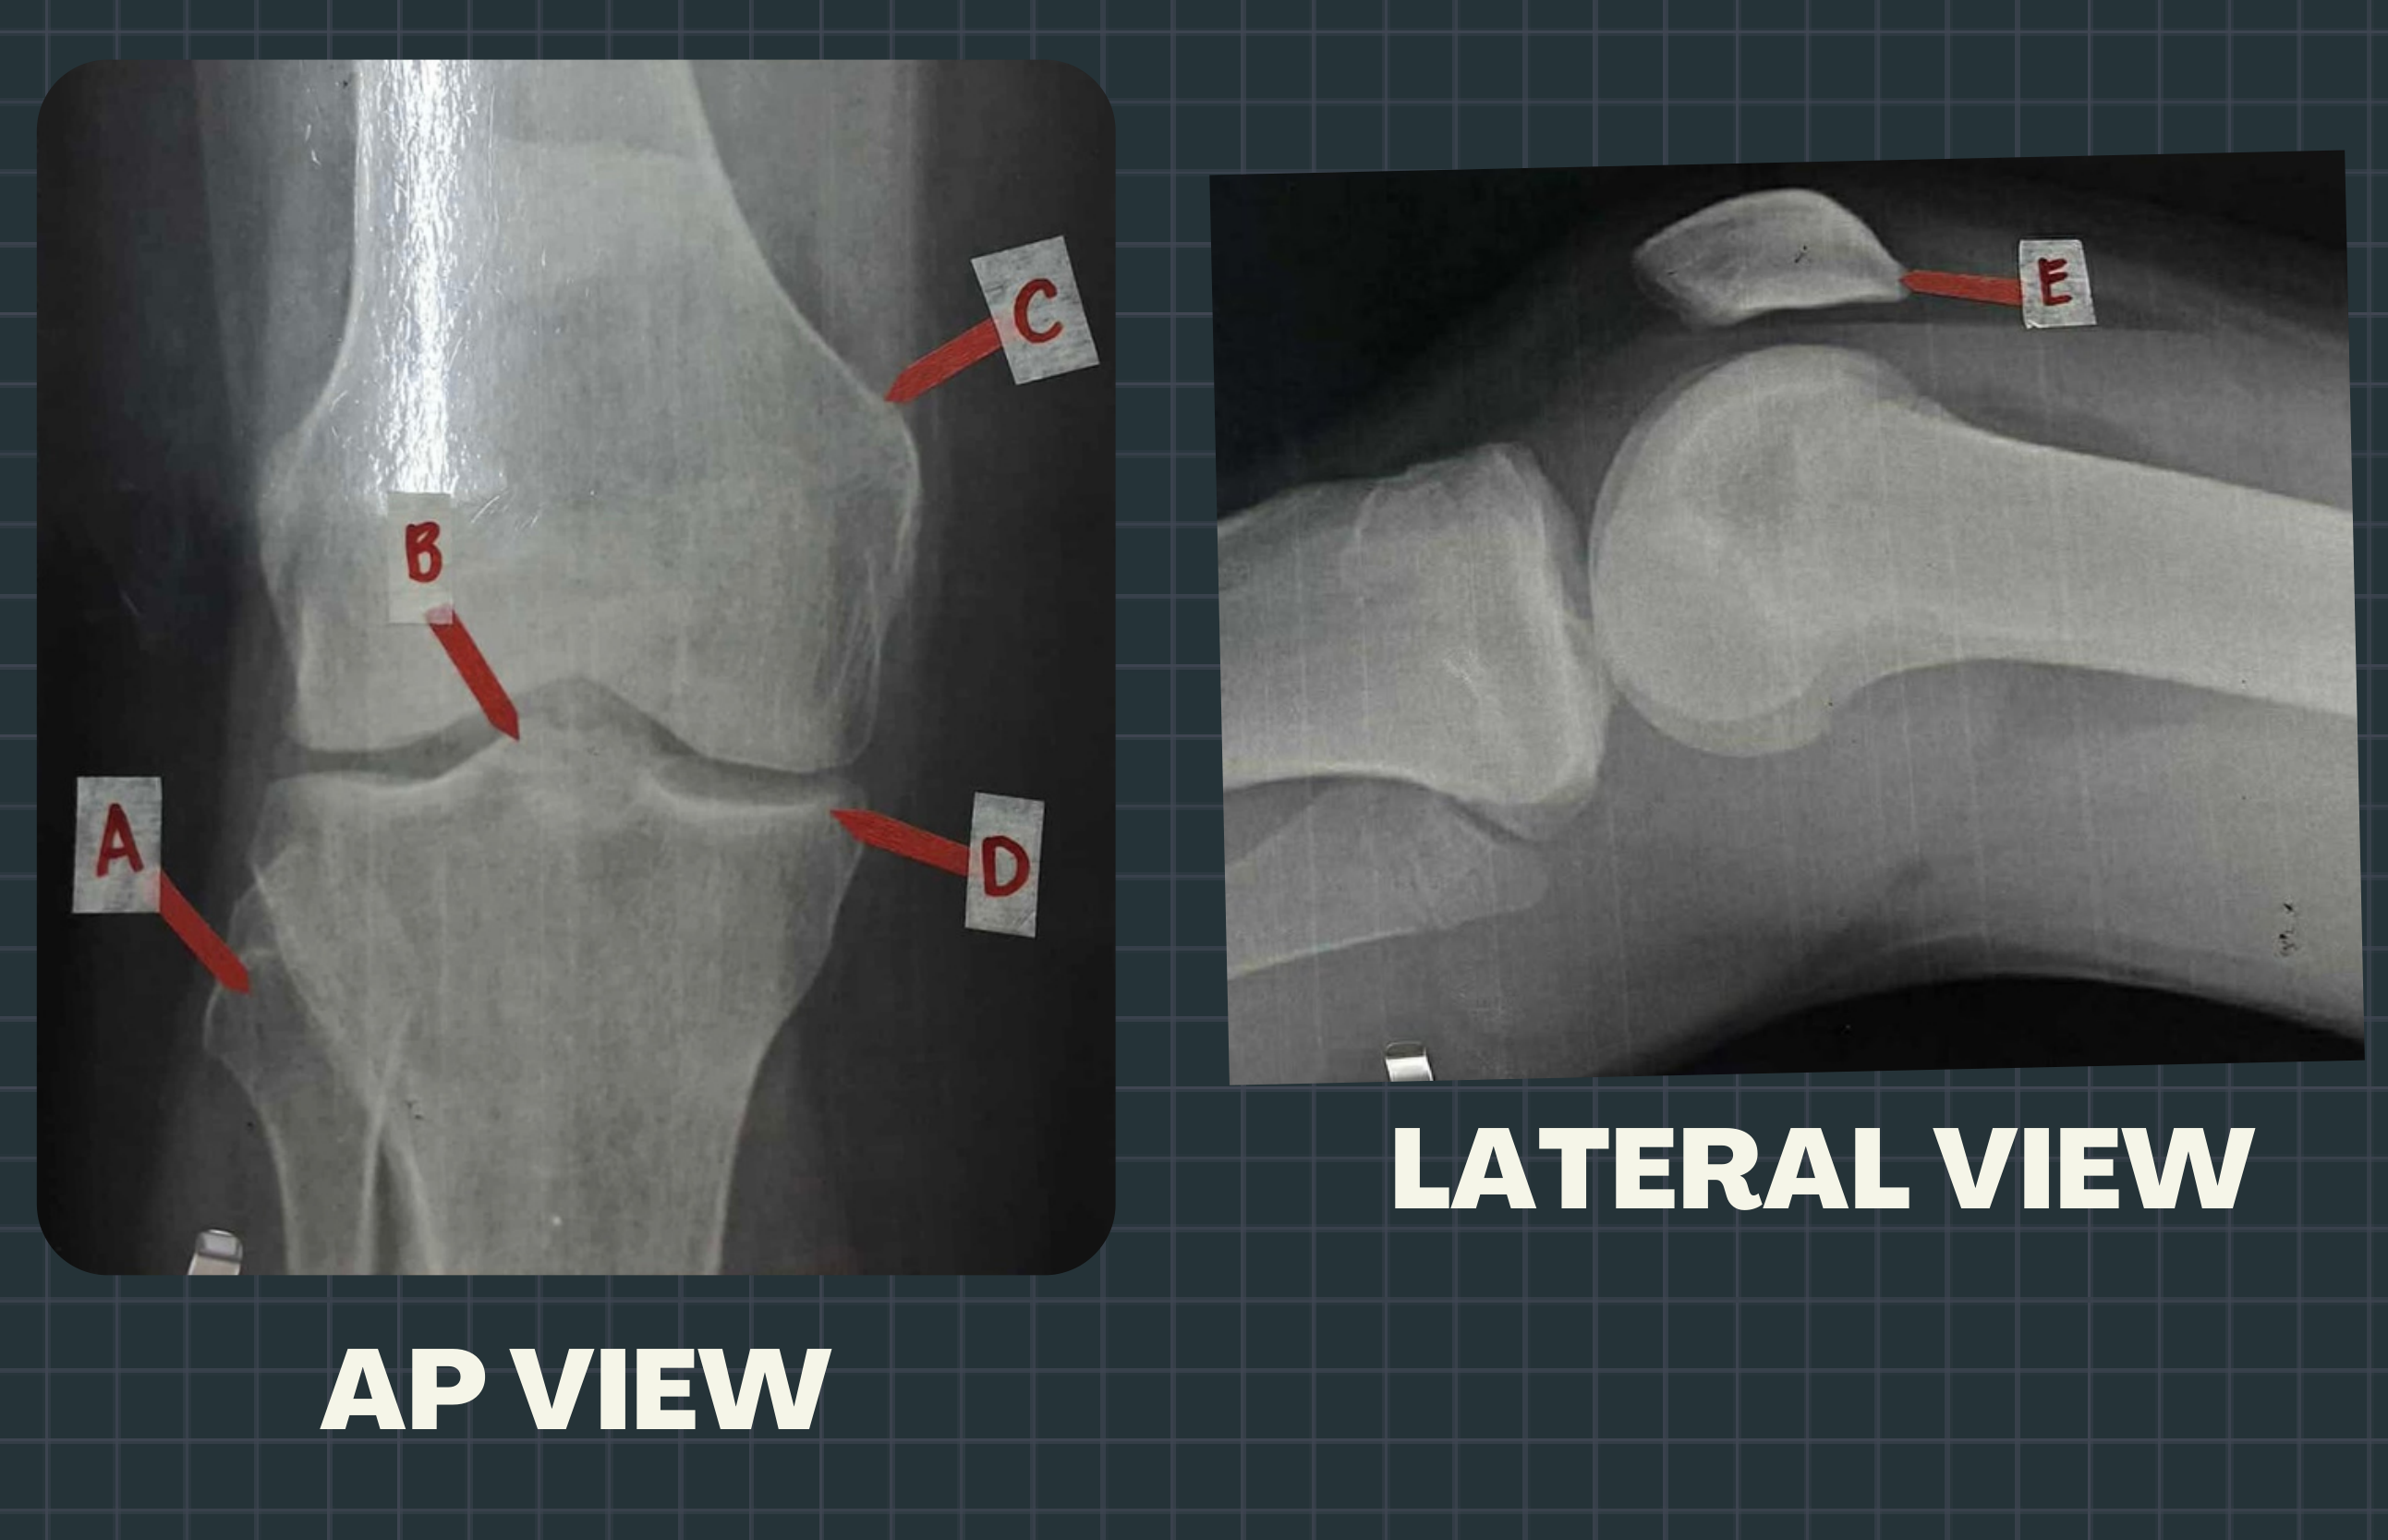
🟢 NORMAL
Diagnosis & Finding
Patellofemoral Pain Syndrome (PFPS / 'Runner's Knee' / Chondromalacia Patellae)
Intact joint spaces. No osteophytes, no subchondral sclerosis, no cortical step-offs. Patellar position and contours are fully normal.
Case 8: Bobby's Organizer Knee Overuse
🎯 Target Landmark Recognition Guide (A–E)
A Head of Right Fibula
🎯 Quick Anchor On the AP view, look at the lower lateral side of the joint (opposite the adductor tubercle).
🔍 How to Trace Follow the slender outer calf bone (fibula) up to its knobby top articulating with the lateral tibial condyle.
💡 Dead Giveaway Bulbous knobby expansion at the proximal fibula with a pointed styloid process (apex) projecting upward.
⚠️ Don't Confuse With Do NOT confuse with the lateral tibial condyle (which is much larger and directly supports the lateral femoral condyle).
B Lateral Intercondylar Tubercle of Right Tibia
🎯 Quick Anchor Look right in the center of the knee joint space on the AP view.
🔍 How to Trace Identify the two sharp bony peaks rising upward from the tibial plateau into the intercondylar notch.
💡 Dead Giveaway The lateral mountain peak of the intercondylar eminence (tibial spine), sitting on the fibular side of the tibial plateau.
⚠️ Don't Confuse With Do NOT confuse with the medial intercondylar tubercle (the slightly taller medial peak on the adductor tubercle side).
C Adductor Tubercle of Right Femur
🎯 Quick Anchor On the AP view, follow the medial border of the distal femoral shaft down toward the medial epicondyle.
🔍 How to Trace Just above the curve of the medial femoral epicondyle, look for a small distinct bony crest.
💡 Dead Giveaway A distinct small bony knob on the uppermost portion of the medial femoral condyle (insertion of adductor magnus tendon).
⚠️ Don't Confuse With Do NOT confuse with the medial epicondyle itself (which is situated lower down on the lateral face of the medial condyle).
D Medial Condyle of Right Tibia
🎯 Quick Anchor On the AP view, look at the upper medial corner of the large tibia bone beneath the medial femoral condyle.
🔍 How to Trace Follow the horizontal line of the medial tibial articular plateau outwards to its rounded medial margin.
💡 Dead Giveaway The broad, wide medial articular platform of the tibia bearing the primary axial load from the medial femoral condyle.
⚠️ Don't Confuse With Do NOT confuse with the lateral tibial condyle (which overhangs the fibular head on the opposite side).
E Base of Right Patella
🎯 Quick Anchor On the LATERAL view, locate the teardrop/sesamoid patella bone floating anterior to the femoral condyles.
🔍 How to Trace Trace along the anterior kneecap; identify the wide, flat superior border.
💡 Dead Giveaway The broad, blunt upper border of the patella where the massive quadriceps tendon attaches.
⚠️ Don't Confuse With Do NOT confuse with the apex of the patella (the pointed inferior tip where the patellar ligament attaches, running to the tibial tuberosity!).
🗺️ Other Identifiable Structures on this View
7 Landmarks Listed
Structure Region / Bone Key Radiographic Recognition Cue
Lateral Condyle of Femur Distal Femur Flatter and more prominent anteriorly to prevent lateral patellar subluxation.
Medial Condyle of Femur Distal Femur More curved and projects further distally to maintain horizontal joint alignment in anatomical valgus.
Patellar Surface of Femur (Trochlear Groove) Anterior Distal Femur Smooth anterior sulcus between femoral condyles where patella glides during flexion/extension.
Groove for Popliteus Lateral Femur Smooth oblique groove on the lateral surface of the lateral femoral condyle for the popliteus tendon.
Tibial Tuberosity Proximal Anterior Tibia Prominence on anterior proximal tibia for insertion of the patellar ligament (site of traction apophysitis in Osgood-Schlatter disease).
Apex of Patella Inferior Patella Pointed inferior pole giving attachment to the patellar ligament.
Femorotibial Joint Space Knee Articulation Radiolucent space between femoral and tibial condyles occupied by the medial and lateral fibrocartilaginous menisci.
📋 Clinical & Radiologic Pearls
Clinical Presentation: PFPS is the #1 cause of anterior knee pain in young active adults ('theater sign' / stair pain). Normal radiographs confirm absence of osteoarthritis, loose bodies, or fractures.
Rehabilitation: Primary treatment is conservative: relative rest, quadriceps strengthening (especially vastus medialis oblique - VMO), hip abductor strengthening, and patellar taping.

All 8 Plenary Cases Master Summary

Rapid reference clinical roster summarizing all cases, modalities, structures, verdicts, and diagnoses.

Hunter ID Hunter & Role Modality Tagged Structures (A–E) Verdict Plausible Diagnosis
HUNTR-01
Station 1
Rumi
Rumi
Lead Striker · Spirit Blade
Lateral Skull Radiograph A: Coronal Suture
B: Frontal Sinus
C: External Occipital Protuberance (Inion)
D: Posterior Arch (Posterior Tubercle) of Atlas (C1)
E: Hyoid Bone
NORMAL Concussion (Mild Traumatic Brain Injury - mTBI)
Blunt head impact + dizziness/headache + completely normal skull radiograph = functional neuronal jarring without structural bone breach.
HUNTR-02
Station 2
Jinu
Jinu
Acrobat Vanguard · Lead Vocal
Anteroposterior (AP) Skull Radiograph A: Lesser Wing of Sphenoid (Sphenoid Ridge)
B: Right Mastoid Process
C: Right Maxillary Sinus
D: Nasal Septum
E: Left External Acoustic Meatus (EAM)
NORMAL Scalp Contusion / Subgaleal Hematoma (without bony fracture)
Localized occipital trauma with intact bone cortex and completely normal intracranial architecture.
HUNTR-03
Station 3
Abby Saja
Abby Saja
Heavy Assault · Iron Fist Brawler
Lateral Cervical Spine Radiograph A: Spinous Process of Axis (C2)
B: Vertebral Body of C4
C: Vertebral Body of C6
D: Superior Articular Facet / Process of C7
E: Spinous Process of C7 (Vertebra Prominens)
NORMAL Acute Cervical Muscular Strain / Whiplash (no bony subluxation or fracture)
High-load impact with focal cervical pain but 100% intact bony architecture, anatomical alignment, and zero neurological deficits.
HUNTR-04
Station 4
Zoey
Zoey
Vanguard Tactician · Aegis Defender
AP Left Clavicle & Shoulder Radiograph A: Sternal End of Left Clavicle
B: Acromioclavicular (AC) Joint
C: Coracoid Process of Left Scapula
D: Greater Tubercle of Left Humerus
E: Left Ribs (Posterior Ribs)
ABNORMAL Closed Complete Oblique Fracture of the Distal Third of the Left Clavicle (Allman Type II / Neer Group II)
Direct shoulder trauma causing cortical fracture through the distal clavicular shaft lateral to the coracoclavicular ligament insertion.
HUNTR-05
Station 5
Healer Han
Healer Han
Chief Medical Officer · Combat Medic
AP and Lateral Radiographs of Right Elbow A: Lateral Epicondyle of Right Humerus
B: Head of Right Radius
C: Olecranon of Right Ulna
D: Trochlear Notch (Semilunar Notch) of Right Ulna
E: Radial Tuberosity of Right Radius
NORMAL Lateral Epicondylitis ('Tennis / Pickleball Elbow' - Extensor Carpi Radialis Brevis tendinopathy)
Repetitive backhand stress causing micro-tearing at the common extensor origin; bony radiograph is entirely normal as this is an extra-articular tendinous injury.
HUNTR-06
Station 6
Baby Saja
Baby Saja
Berserker Assault · Shadow Striker
PA / Oblique Radiograph of Right Hand A: Middle Phalanx of the 4th Digit (Ring Finger)
B: Head of the 2nd Metacarpal (Index Knuckle)
C: Sesamoid Bone of the 1st Metacarpophalangeal (MCP) Joint
D: Scaphoid Bone of the Right Carpus
E: Styloid Process of Right Ulna
ABNORMAL Boxer's Fracture (Fracture of the 5th Metacarpal Neck)
Classic axial impact on a clenched fist causing compressive failure of the volar cortex of the weakest neck region of the 5th metacarpal.
HUNTR-07
Station 7
Celine
Celine
Siren Lead · Sonic Resonance Specialist
Anteroposterior (AP) Pelvis Radiograph A: Right Anterior Sacral Foramen
B: Right Superior Pubic Ramus (FRACTURE SITE!)
C: Pubic Symphysis
D: Left Anterior Superior Iliac Spine (ASIS)
E: Left Greater Trochanter of Femur
ABNORMAL Isolated Closed Fracture of the Right Superior Pubic Ramus (Low-energy fragility / insufficiency pelvic ring fracture)
Low-energy fall in a 52-year-old female causing direct compressive stress across the thin superior pubic strut with clear cortical fracture line.
HUNTR-08
Station 8
Bobby
Bobby
Tactical Ops Commander · Quartermaster
AP and Lateral Radiographs of Right Knee A: Head of Right Fibula
B: Lateral Intercondylar Tubercle of Right Tibia
C: Adductor Tubercle of Right Femur
D: Medial Condyle of Right Tibia
E: Base of Right Patella
NORMAL Patellofemoral Pain Syndrome (PFPS / 'Runner's Knee' / Chondromalacia Patellae)
Repetitive eccentric quadriceps loading causing retropatellar cartilage irritation without any bony disruption; normal X-rays are the classic finding in PFPS.